Auto-zoom screen recording on Mac, Windows, Linux
How auto zoom in screen recordings works (cursor data vs guessing from pixels), nine tools for Mac, Windows and Linux with US prices, step-by-step setup, and when to turn zooms off.
 Berkay Akpolat14 min read
Auto-zoom screen recording means the camera in your finished video moves in on each click, field and menu by itself, then pulls back when the view changes. It works best when the recorder logs your cursor and clicks next to the video. Screen Studio is the best-known option but runs on Mac only. On Windows, Tella, Cap, FocuSee, Camtasia and Bandicam do it; on Linux, OpenScreen, Recordly and Clevera (click zooms on GNOME).
Updated 2026-11-04
In this guide
- What auto zoom is, and why tutorials need it
- How auto zoom works: cursor data vs guessing from pixels
- Auto-zoom screen recorders and Screen Studio alternatives
- How to add automatic zooms to any screen recording
- How to do it in Clevera, step by step
- When to turn auto zoom off
- FAQ
What auto zoom is, and why tutorials need it
Auto zoom is one of the zoom effects a screen recorder or editor adds for you: a camera move that frames where something happens, holds while the viewer reads, and returns to the full screen when the context changes. No hand-drawn keyframes.
It matters because of where tutorials are watched: most play in a help-center or docs column about 700 pixels wide. A 1920 × 1080 recording, the most common desktop screen size (27.82% of desktop page views, StatCounter, October 2026), shrinks to about 37% there, so 14-pixel menu text shows at about 5 pixels. A 1.5× zoom brings it to about 8 pixels: small, but readable on a laptop. Phones carried 59.9% of worldwide web page views that month (StatCounter); in a 390-pixel column, text drops to about 3 pixels, and only a closer zoom or a smaller recording window helps. (Pixel figures: our arithmetic.)
How auto zoom works: cursor data vs guessing from pixels
A screen recorder decides where to zoom in one of two ways: it reads a log of clicks and cursor positions recorded next to the video, or it guesses clicks from the pixels of a finished video. The click log gives tighter, more accurate zooms.
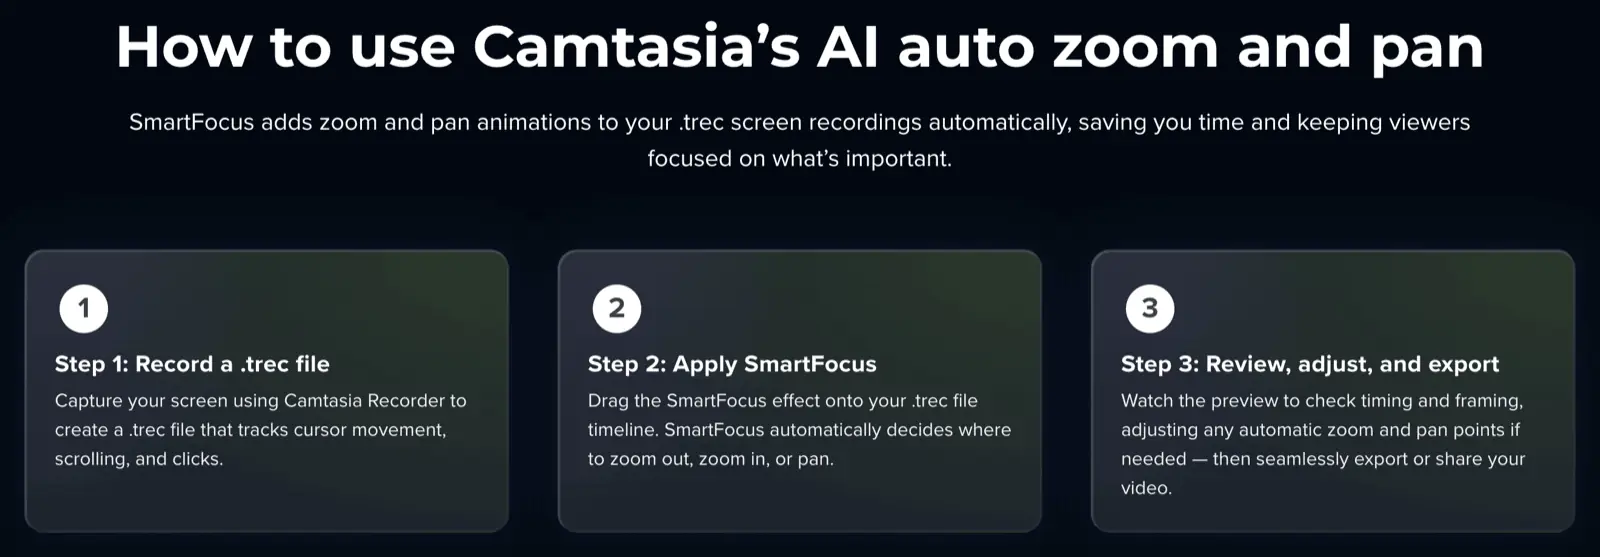
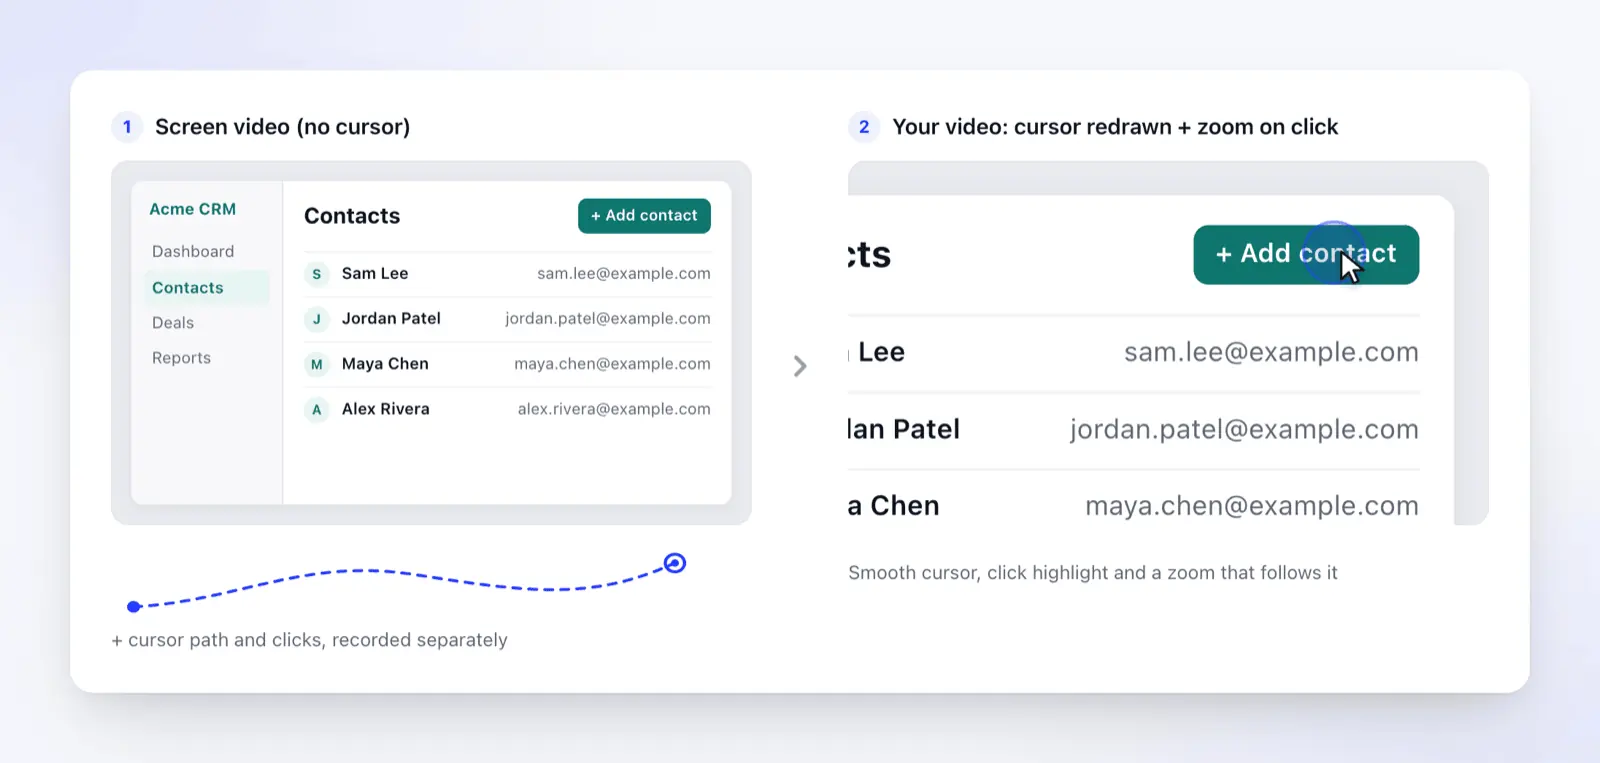
1. The recorder logs your cursor and clicks as data. The app records the screen without the pointer and, next to it, a timeline of where the pointer was and when you clicked, scrolled or typed. Screen Studio's FAQ describes this directly: it records "ignoring the mouse cursor" and adds the cursor back from recorded mouse data. Camtasia does the same with its .trec files, which track cursor movement, scrolling and clicks.
Because the editor knows exactly where each click landed, it can aim the camera at the clicked control, redraw a smooth cursor at any size, and join quick clicks in one area into one zoom.
2. The tool guesses from the pixels. An MP4 from another recorder has no click log, so the tool watches the video, spots what looks like a click and zooms to a fixed point. It can't follow the pointer, and it can miss clicks that change little on screen.
So the same tool can give different results depending on the source. Tella's help says its Mac and Windows apps record the cursor data Auto Zoom needs, and its Chrome extension does too for a tab, but not for a window or the whole screen. Clevera zooms uploads to a fixed point found in the video. Desktop recordings with click data come out best.
Linux adds one more wrinkle. On Wayland, apps don't get mouse-button events through the screen-sharing portal. OpenScreen reads the left button from the kernel input device instead, which needs a udev rule or the input group; without it, every cursor sample is "simply a move", its README says. Cap's Linux app records no cursor or click data on Wayland yet (open issue #2419). Clevera captures clicks on GNOME through its Clevera for GNOME extension (one log-out and log-in after setup); on KDE Plasma or an X11 session it records the pointer but not clicks, so expect fewer automatic zooms.
Auto-zoom screen recorders and Screen Studio alternatives for Windows and Linux
Sources: each vendor's product, pricing and docs pages or GitHub repository, read on 2026-11-04; we ran no hands-on tests. FocuSee shows local currency in some countries, so we read its US price from the page source.
| Tool | OS | Auto zoom from | Editing after | Price (US, as of 2026-11-04) |
|---|---|---|---|---|
| Screen Studio | Mac only | Recorded clicks; each zoom Auto or Manual | Timeline, zoom blocks | $9/mo billed yearly, $29 monthly |
| Tella | Mac, Windows, Chrome | Clicks and cursor recorded by its apps (extension: tab recordings only) | Timeline and transcript editor | Pro $13/user/mo billed yearly; free trial |
| Cap | Mac, Windows (beta), Linux (no click data on Wayland yet) | Recorded clicks and cursor | Built-in editor (Studio Mode) | Free for personal use; $29/yr or $58 once for commercial use; Pro $12/user/mo |
| FocuSee | Mac, Windows | Recorded clicks and typing | Built-in editor | $49.99/yr or $19.99/mo (Standard) |
| Camtasia SmartFocus | Mac, Windows | .trec cursor, scroll and click data |
Full timeline editor | Essentials $179.88/yr; zoom and pan are watermarked on the $39 Starter plan |
| Bandicam Smart Zoom | Windows | Clicks and mouse movement, applied after recording | Built-in player and editor | Personal license from $33.26/yr (sale price); free version adds a watermark |
| OpenScreen | Mac, Windows, Linux | Cursor position; clicks on Linux need input access | Timeline editor | Free, open source (MIT) |
| Recordly | Mac, Windows, Linux | Zoom suggestions from cursor activity | Timeline editor | Free, open source (AGPL-3.0) |
| Clevera | Mac, Windows, Linux (clicks on GNOME) | Recorded clicks, typing and cursor path, planned by AI (Linux: typing only with Typed text on) | Zoom tab with keyframed paths | Free plan; MP4 download from Starter ($29/mo billed yearly) |
What each does best:
- Screen Studio is the reference for polished Mac demos, with every feature in every plan and export up to 4K at 60 fps.
- Tella suits people who record, edit and share in one place.
- Cap suits quick shareable videos, with a free personal tier.
- FocuSee covers the same ground as Screen Studio (auto zoom, cursor effects, camera layouts) on Windows too.
- Camtasia puts auto zoom inside a full editor with quizzes and SCORM export (Essentials and up), captions and an optional asset library. SmartFocus needs recordings from Camtasia Recorder.
- Bandicam is a low-cost Windows recorder: you switch on Smart Zoom after recording an area or the full screen.
- OpenScreen and Recordly are free and run on Linux. The original OpenScreen repository is archived; its README points to getopenscreen/openscreen, which released v2.2.1 on 2026-11-03.
- Clevera is different in kind: the zooms are one part of a narrated how-to video and article made from the recording (more below).
For recorders without auto zoom too, see the best screen recording tools; the Linux screen recorder roundup covers Wayland in depth, and Camtasia alternatives compares full editors.
How to add automatic zooms to any screen recording
- Record with the tool's own recorder. That produces the click log. An MP4 from QuickTime, OBS or Xbox Game Bar usually gets manual zoom only, or zooms guessed from pixels.
- Record the right source. In browser extensions, record a tab, not the whole screen, for click data. On Linux, set up click capture first (an extension or input-device access).
- Click with intent. Move to the target, pause, click, then pause on the result. Avoid circling the pointer while you talk: fewer stray clicks mean fewer stray zooms.
- Let the tool generate zooms, then review them. Most tools zoom in on clicks automatically, so check each zoom for a cut-off result (a toast, a menu that opens off-frame) and for zooms too short to read.
- Fix in three ways: delete the zoom, change its level, or move its focus. For moves across the screen (from a menu to a form), use a keyframed pan instead of two zooms.
- Watch the export where viewers will, in a help-center-width player and on a phone. If text is still unreadable, zoom closer or record a smaller window.
How to do it in Clevera, step by step
Clevera is an AI platform that turns a screen recording into a narrated how-to video, a step-by-step help article and a page on your hosted help center, in 74 languages. Auto zoom is part of that AI tutorial maker workflow: you don't switch it on, the AI plans the camera from what you did.
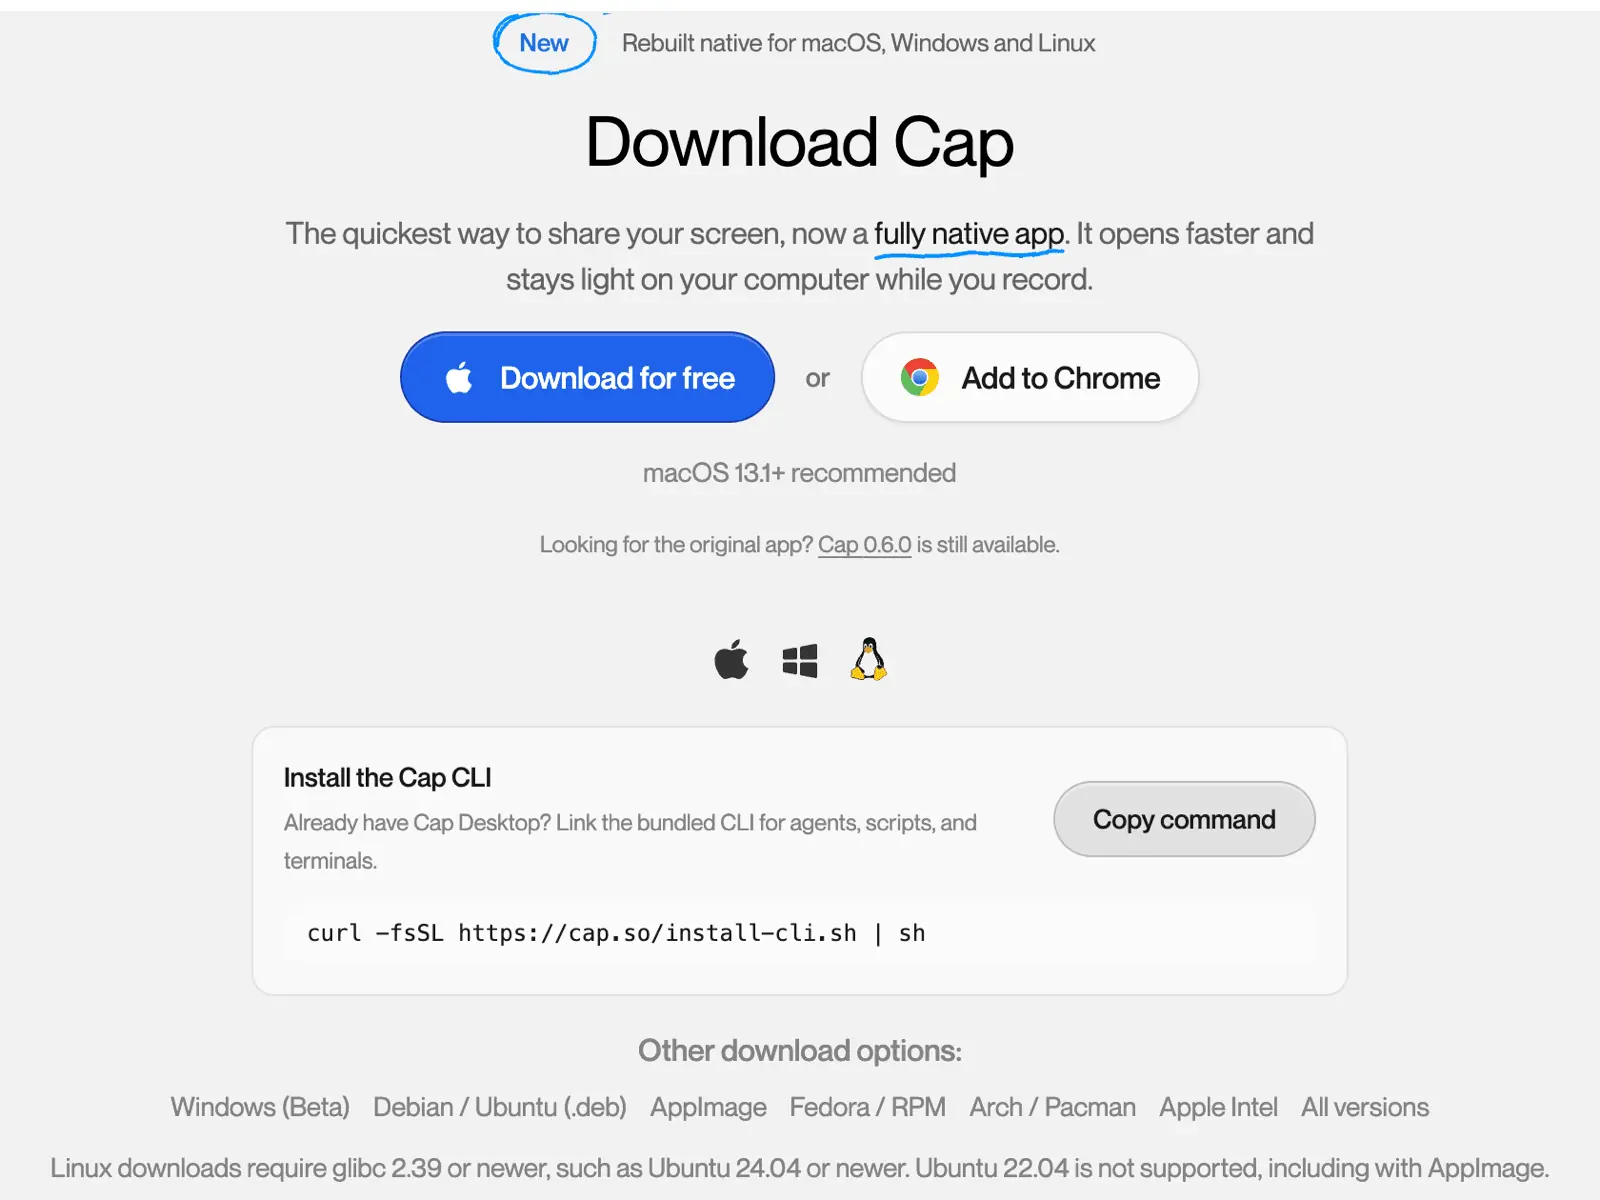
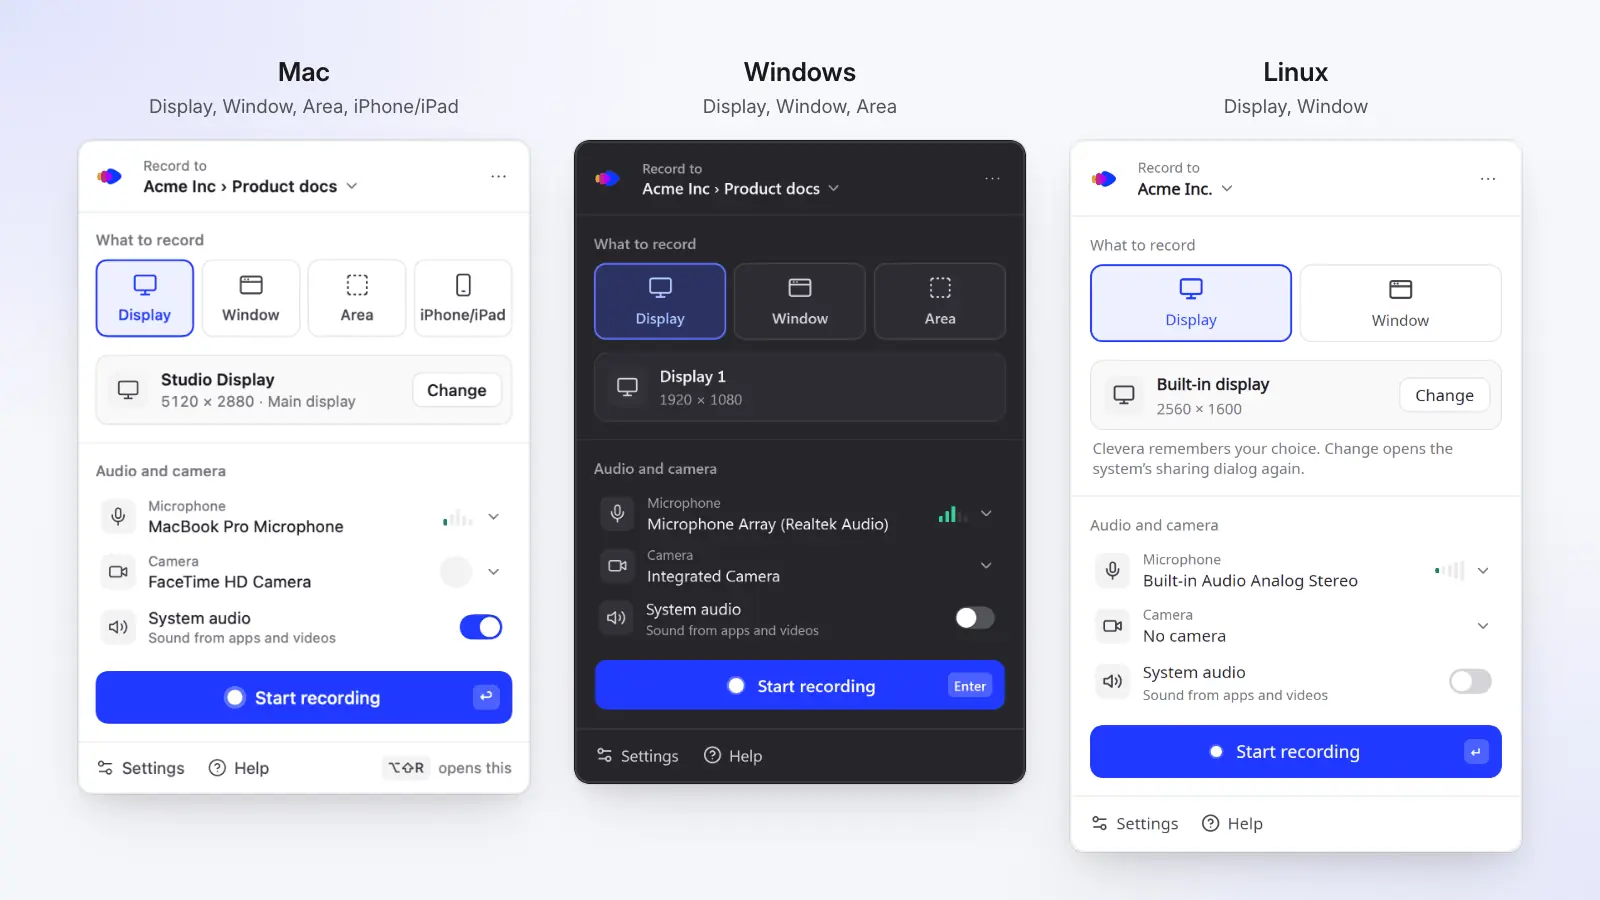
1. Record with the desktop app. It runs on Mac, Windows and Linux. Mac and Windows can record a display, a window or an area; Linux records a display or a window, with no Area or iPhone recording. Get it from the Download page, and see what's new in the Clevera recorder for Mac, Windows and Linux.
2. Make a how-to video from the recording. Click Create, open How-to and pick a card such as Product walkthrough. Under What should we make it from?, choose Choose from library and your recording, then click Generate video. There is no zoom switch: the AI zooms in on your clicks and typing at 1.5× to 1.6×, plays page changes wide and pulls back when you scroll (all the rules).
Example output (invented store, Fernhill Goods): the camera zooms in on the order search and the refund form, then pulls back.
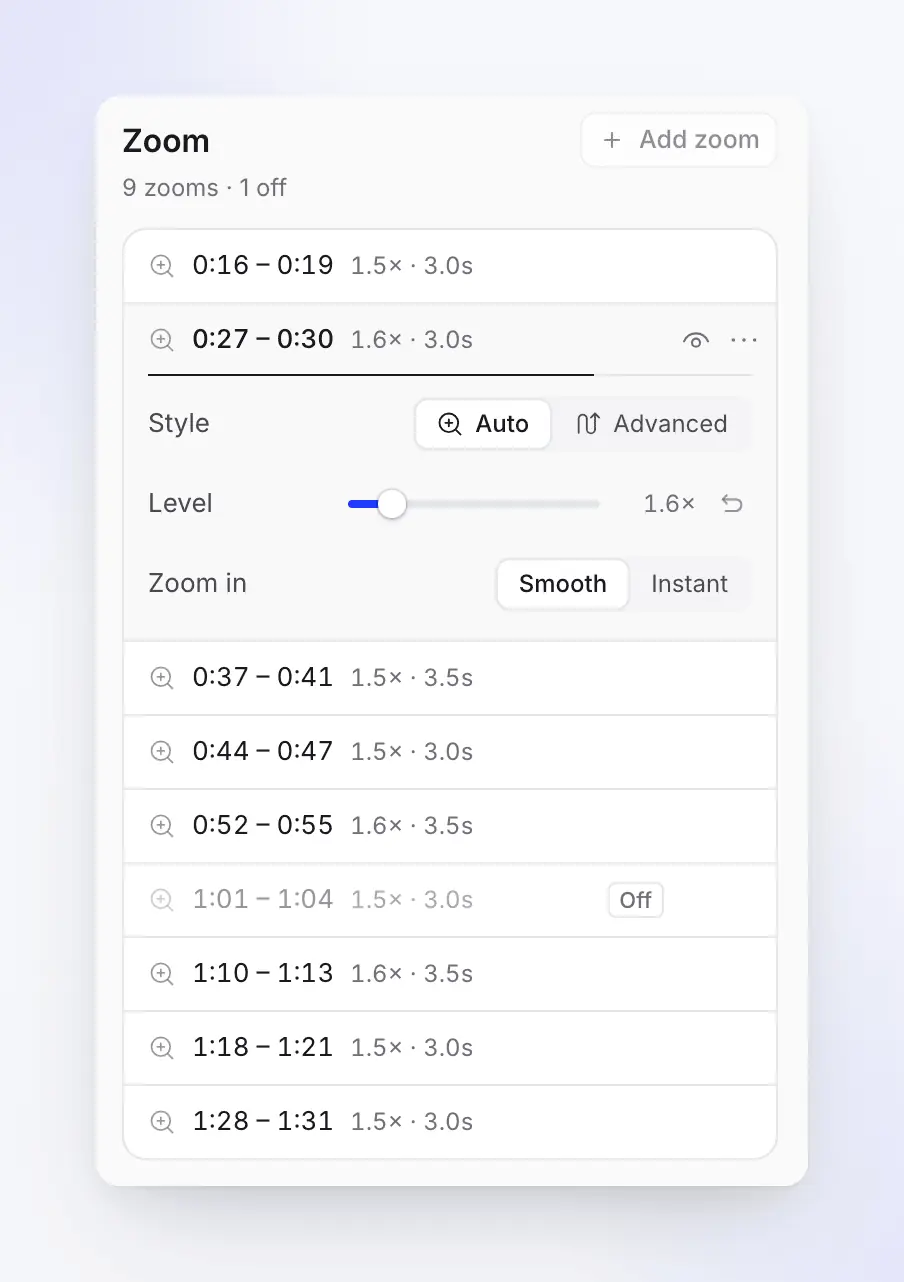
3. Adjust in the Zoom tab. The editor's Zoom tab lists every zoom with its time and level; the same zooms appear as chips under the timeline. Use the eye icon to turn one off, Add zoom to add your own (5 seconds at 1.5×), and set Level anywhere from 1.1× to 4×, with Smooth or Instant zoom-in.
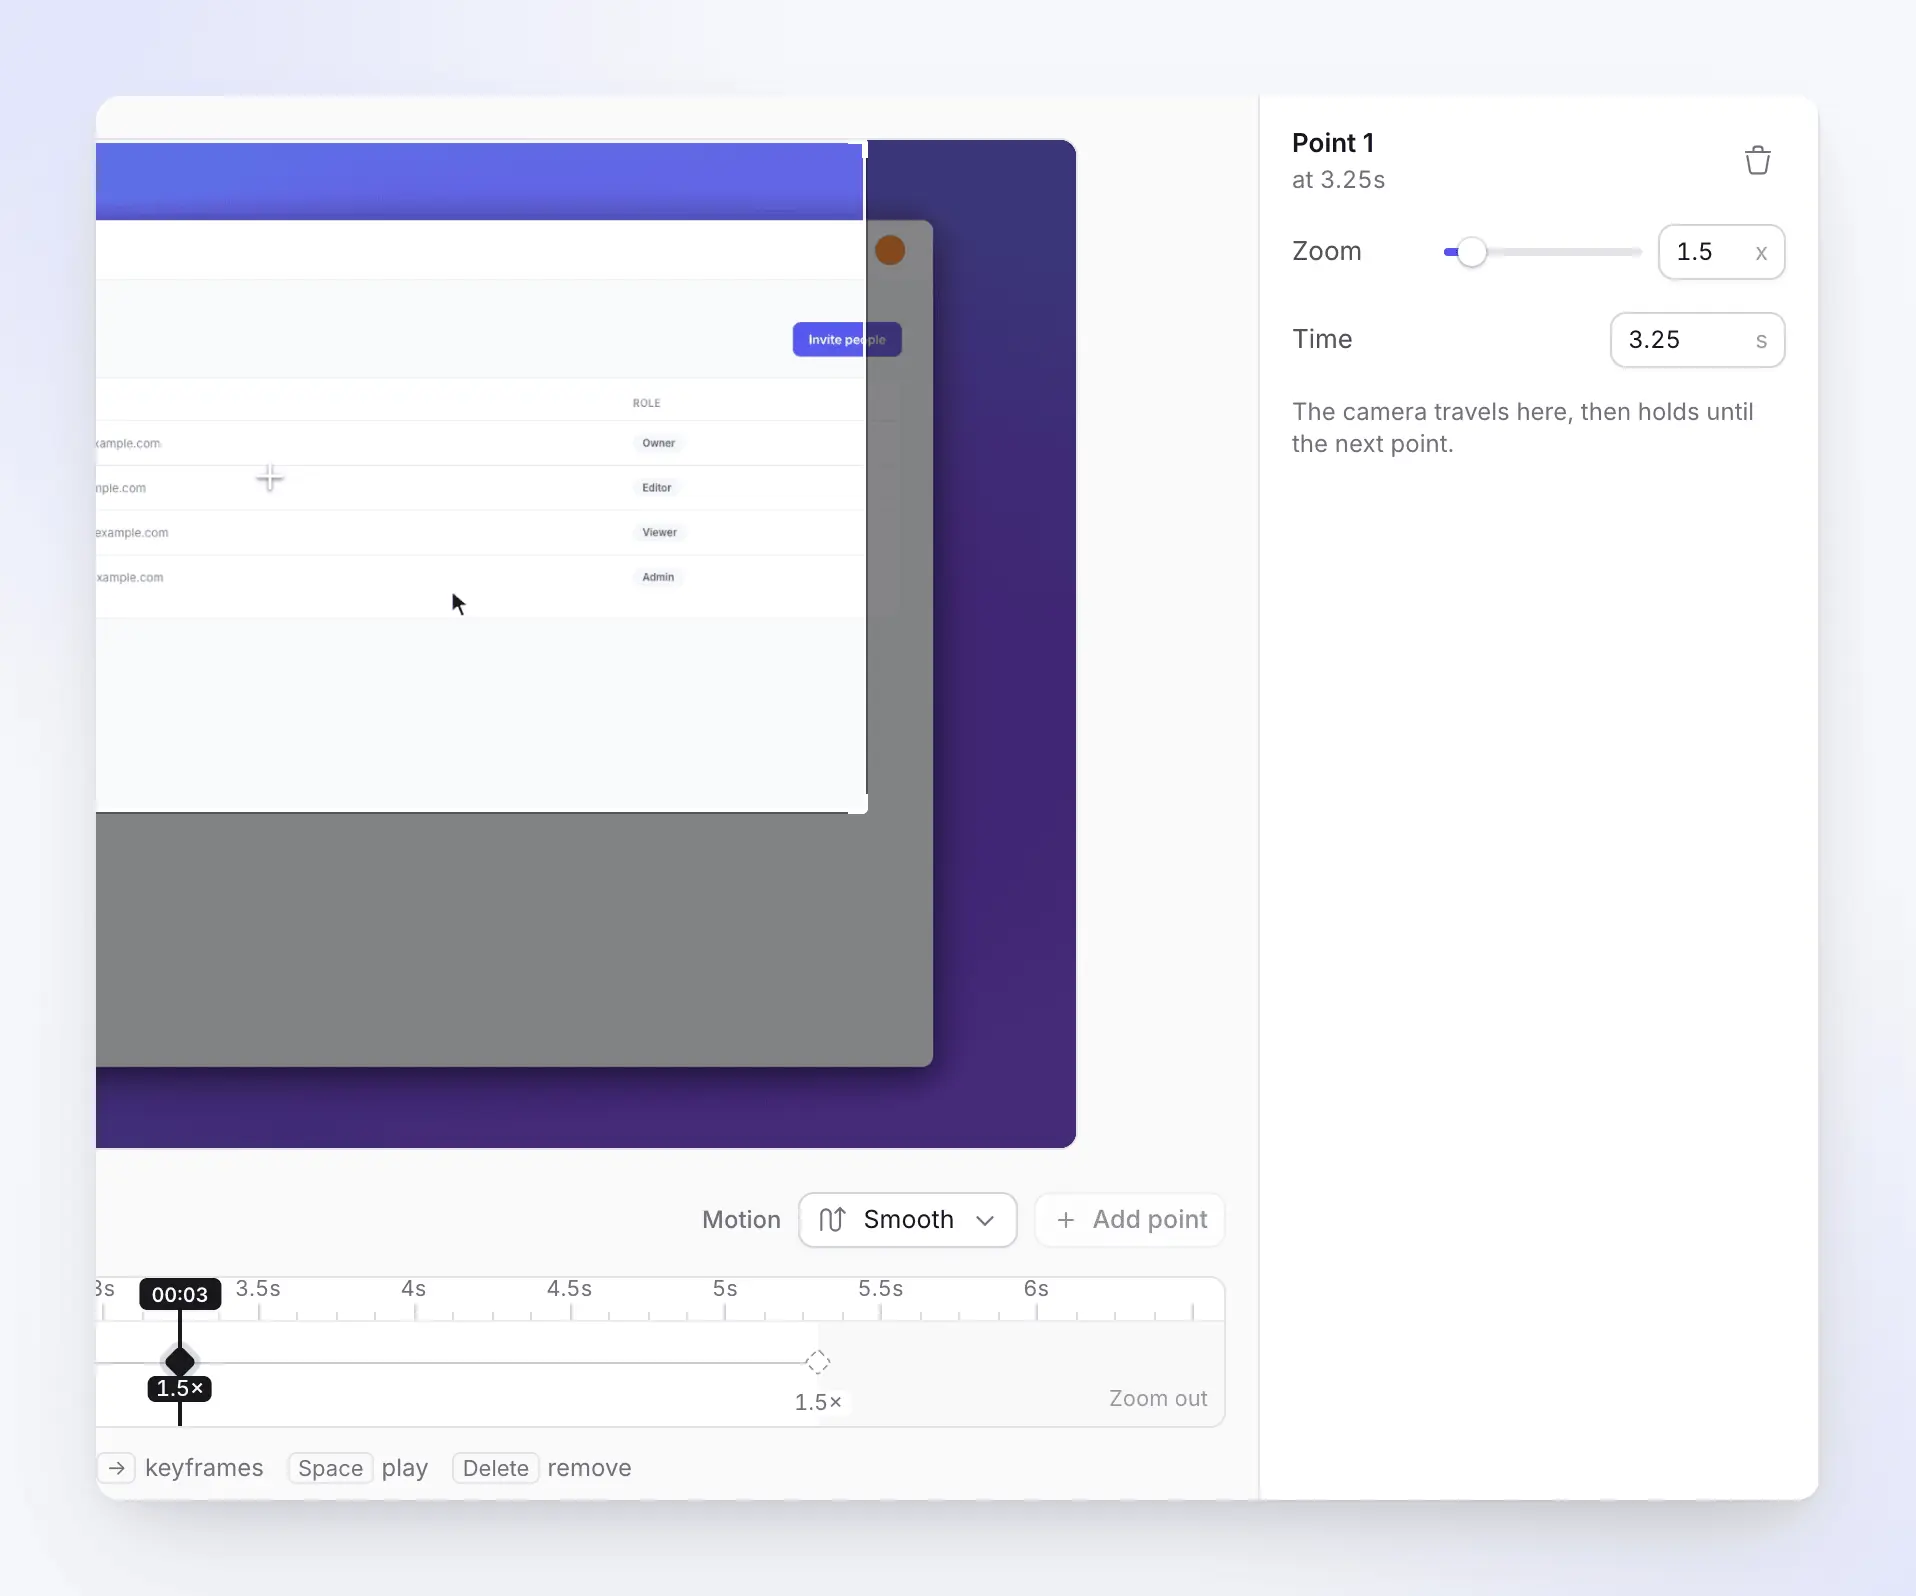
4. Draw a path with keyframes when you need a pan. Switch a zoom from Auto to Advanced, then choose Edit path… to open Zoom & pan. Each diamond on the track is a point the camera travels to; add up to 20 per zoom with Add point, pick a Motion (Smooth, Magnetic or Snap), preview it, then Save path. The adjust zooms article covers every control.
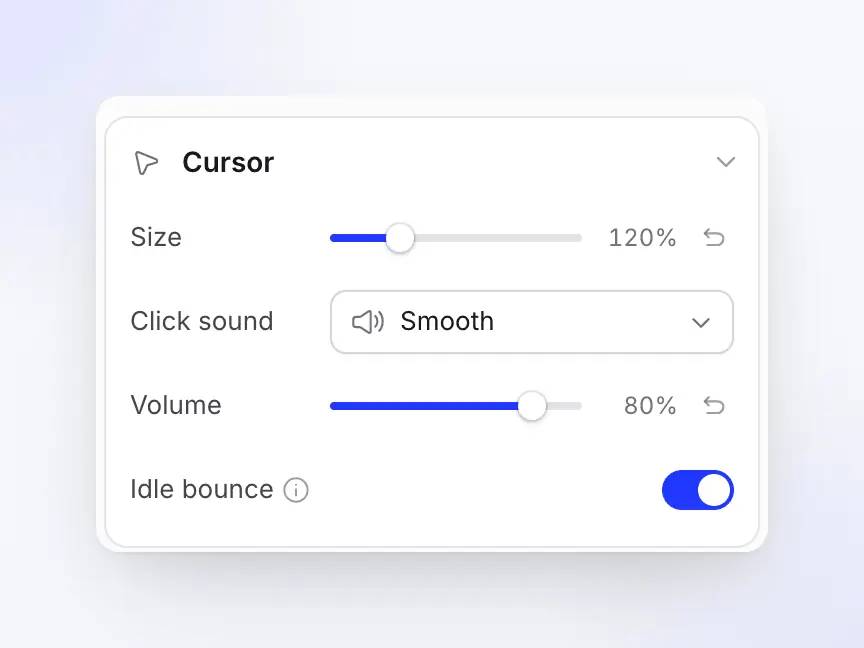
5. Tune the cursor. Because the pointer is redrawn, you can change it after recording under Style > Cursor: Size (50–300%), Click sound, Volume and Idle bounce. The section only appears for recordings where Clevera draws the pointer.
Plans. Auto zoom works on every plan. The Free plan makes videos up to 3 minutes, shared by link and embed, with no MP4 download; MP4 export starts on Starter ($29/mo billed yearly, $36 monthly) at up to 2K, and 4K is on Pro. See pricing.
Where Clevera is not the right pick: for a styled screen video with your own voice and manual control of every frame, Screen Studio or Cap is more direct. Clevera's Styled for sharing adds a background, title cards and auto zooms without an AI voice, but its focus is the narrated how-to and the article. For public web apps, Clevera's AI screen recorder can also click through a flow and record it for you.
For the full workflow, see how to turn a screen recording into a polished tutorial video, the guide on how to make a tutorial video and how to make tutorial videos without showing your face.
When to turn auto zoom off
Auto zoom helps most when a desktop UI is dense and the player is small. It hurts in these cases:
| Situation | What goes wrong | What to do |
|---|---|---|
| Phone or portrait recordings | The UI already fills the frame; a 1.5× zoom cuts off the edges and can fill the frame with the keyboard | Leave it wide. Clevera skips automatic zooms on portrait recordings and doesn't capture taps from an iPhone, so add any zoom by hand; see how to record your iPhone screen on a Mac |
| Scroll-heavy footage (long pages, logs) | The camera chases the content and viewers lose their place | Keep the shot wide and use a highlight instead |
| Fast bursts of clicks across the screen | Zoom in, out, in again: tiring to watch | Merge them into one wider zoom or a single pan |
| Large UI already (presentation mode, big fonts) | Zoom adds motion without adding legibility | Turn the zooms off |
| Viewers sensitive to motion | Repeated camera moves can cause discomfort | Use fewer, slower zooms (Smooth, not Instant) and fewer pans |
Balance problems are common: in a US national health survey, 35.4% of adults aged 40 and older had vestibular dysfunction on a balance test (Agrawal et al., 2009), and the W3C's guidance on animation from interactions notes that non-essential motion can trigger dizziness and nausea in people with vestibular disorders. Fewer, slower zooms are the safer default; a zoom every two seconds is hard on those viewers.
FAQ
Is there a Screen Studio alternative for Windows or Linux?
Yes. Screen Studio's FAQ says it supports only macOS, with no near-future plans for Windows. On Windows, Tella, Cap, FocuSee, Camtasia and Bandicam add zooms from recorded clicks; on Linux (and Windows), OpenScreen, Recordly and Clevera (click zooms on GNOME) do.
Is there a free auto-zoom screen recorder?
Yes. OpenScreen and Recordly are free and open source on Mac, Windows and Linux, and Cap is free for personal use. Clevera's Free plan includes auto zooms (videos up to 3 min, no MP4 download).
Can I add auto zoom to a video I already recorded?
Sometimes. Without a click log, a tool infers clicks from the pixels and zooms to a fixed point. Clevera does this for uploaded videos, and you can set each zoom's Focus point by hand. For the best result, use the tool's own recorder.
Can OBS zoom in on the mouse automatically?
Not built in. A community Lua script, obs-zoom-to-mouse, zooms a display capture toward the pointer when you press a hotkey, but it works live (no editing afterwards) and hasn't been updated since June 2024. For zooms you can adjust later, use one of the tools above.
Why doesn't auto zoom pick up my clicks on Linux?
On Wayland, apps don't receive mouse-button events through the screen-sharing portal, so each tool needs its own workaround (see how auto zoom works). Clevera captures clicks on GNOME through an extension that loads after you log out and back in; on KDE Plasma and X11 it records the pointer but not clicks.
How much should a screen recording zoom in?
Usually 1.5× to 2×. Each step up crops the source: at 2× on a 1080p export, the frame shows only 960 × 540 recorded pixels, so text softens. If you need more, record a smaller window or at a higher resolution instead. Clevera plans 1.5× to 1.6× and lets you set 1.1× to 4×.
Turn your next recording into a zoomed, narrated how-to
Record on Mac, Windows or Linux. Clevera plans the zooms, writes the voice-over and the help article, and you fine-tune any zoom in the Zoom tab.
Or read how automatic zooms and the cursor work in Clevera.