ReadMe integration
Publish developer guides to ReadMe from a screen recording
Your API reference explains the endpoints. Your guides explain everything around them. Record a flow once, and Clevera writes the guide with screenshots and publishes it to your ReadMe developer hub, in the guide category you pick.
Guides in your developer hub
ReadMe callouts and code tabs
Screenshots uploaded to ReadMe
Update by address
What you can do
The guides around your API,
written from the product itself.
Developers land in your ReadMe hub to get started: create an account, find the API key, set up a webhook, test in the dashboard. Those pages are screenshots and clicks, and they go stale every time the dashboard changes. Clevera writes them from a recording.
Getting started, shown click by click
Record the path from sign-up to the first API call in your dashboard. Clevera turns it into a guide with numbered steps and a screenshot for each one.
Code stays code
Code blocks keep their language and title. Tabs that hold only code become ReadMe code tabs, so a cURL, Node and Python sample sit side by side.
Filed where developers browse
Choose a guide category, such as Getting Started or Webhooks, and the guide appears there in the Guides section of your hub.
Screenshots hosted by ReadMe
Screenshots are uploaded to ReadMe, so the guide keeps working even if you delete the article in Clevera.
Refresh guides when the dashboard changes
Re-record the flow, update the article in Clevera and publish again. Clevera finds the guide by its address and overwrites it in place.
Safe with ReadMe’s page format
Curly braces and angle brackets in your text are escaped, so placeholders like {API_KEY} show exactly as written.
How it works
From recording to ReadMe guide
in four steps.
Paste your project’s API key once. After that, any article in the workspace can become a guide in your hub.
- 1
Connect your project
Copy an API key from your ReadMe project’s Configuration, paste it into Clevera and let it check the key. - 2
Clevera writes the guide
From your screen recording, Clevera writes the guide: steps, screenshots, callouts and code. - 3
Pick a guide category
In Share, open Publish, choose the guide category and click Publish to ReadMe. - 4
It’s in your Guides
The guide appears under that category in your project’s main version, at an address made from its title.
See it in Clevera
Publishing to ReadMe,
from the article’s Share window.
No pasting into the ReadMe editor, no uploading screenshots one at a time, no rewriting callouts in ReadMe’s syntax. The Share window publishes the guide for you.
One key, one project
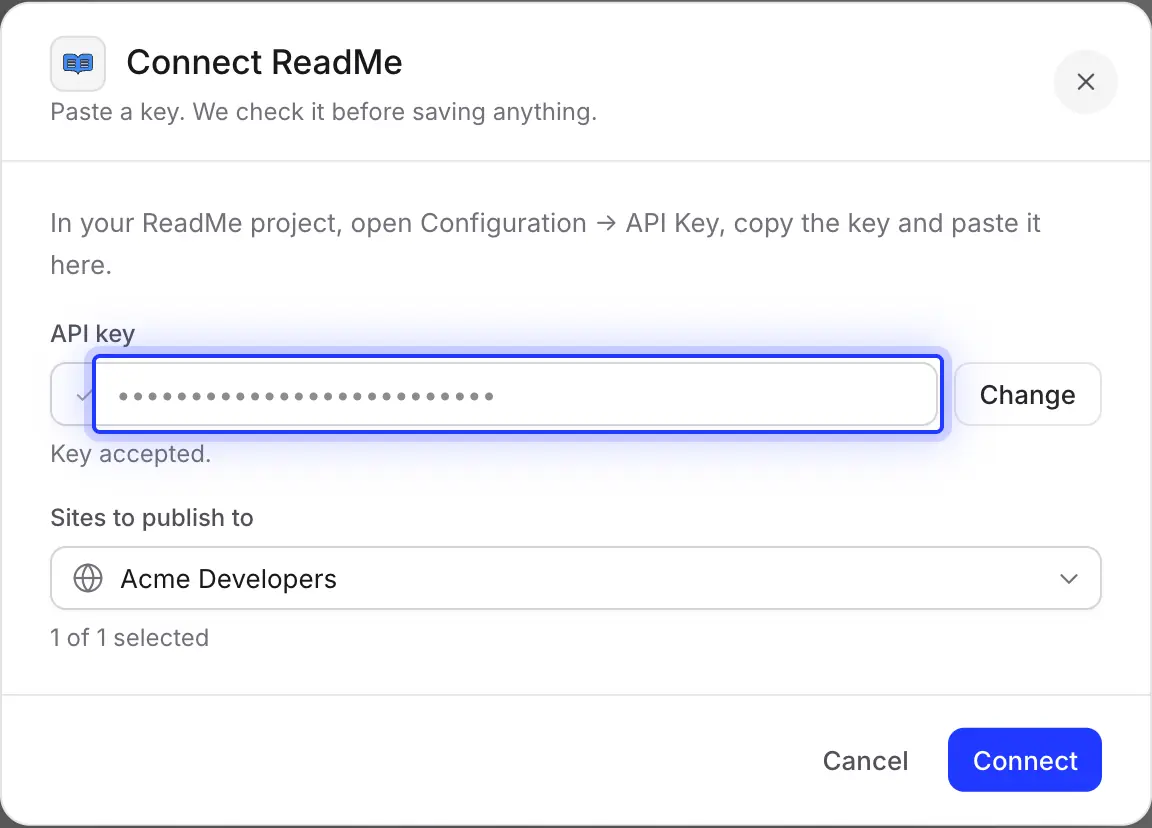
In ReadMe, open your project’s Configuration → API Keys and copy a key. Paste it into Clevera and click Check key; Clevera shows the project the key belongs to before saving anything.
The key gives full access to that project, so keep it private. To publish to a different project, reconnect with that project’s key.
Choose the guide category
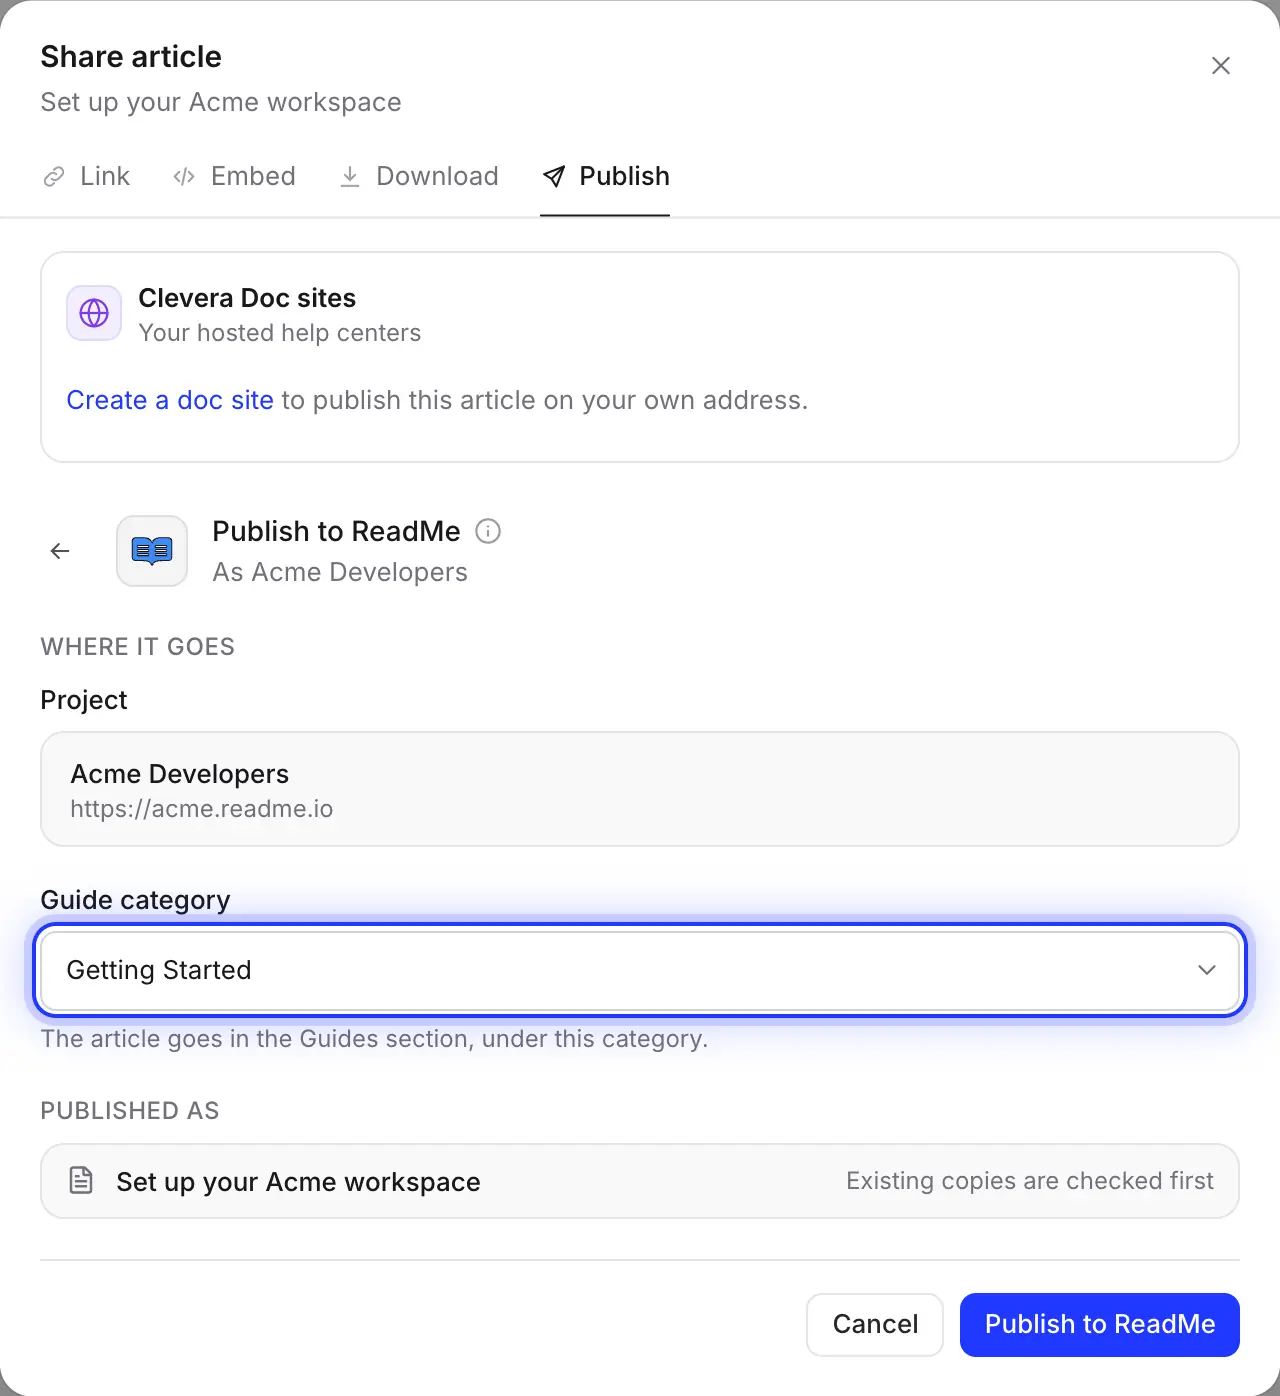
Project shows the connected hub. Pick a Guide category: the guide goes in the Guides section, under that category. No categories yet? Create one in ReadMe first.
The address comes from the title, so “Create your first API key” becomes /docs/create-your-first-api-key.
Filled in for you
What lands in your developer hub
and what you decide.
Clevera converts the article into ReadMe’s own page format, so the guide uses ReadMe’s callouts, code blocks and embeds and can be edited in ReadMe like any other.
- Guide categoryYou choose
- Any category in your project’s Guides. Clevera publishes to the main (stable) version of your docs.
- Title and addressSet for you
- The article’s title, and an address made from it under
/docs/. If that address is taken, ReadMe gives the new guide a slightly different one. - VisibilityYou decide
- Clevera doesn’t set it, so a new guide gets ReadMe’s default: public. Change it in ReadMe right after publishing if you want to review first. Updates keep the visibility a guide already has.
- CalloutsConverted for you
- ReadMe callouts with their title: 📘 for info and notes, 👍 for tips and success, 🚧 for warnings and ❗️ for danger.
- Code and tabsConverted for you
- Code blocks keep their language and title. Tabs that hold only code become ReadMe code tabs; other tabs become labelled sections.
- Steps and togglesConverted for you
- Numbered steps become a numbered list with each step’s title in bold. Collapsible sections become ReadMe expandable sections.
- Screenshots and videosSet for you
- Screenshots are uploaded to ReadMe with their captions. Videos placed in the article become ReadMe embeds; a Clevera video needs its share link on.
Setup
Set up the ReadMe integration
in about two minutes.
You need a Clevera workspace on Pro or above, and a ReadMe project on ReadMe Refactored with at least one guide category. The workspace owner or an Administrator connects ReadMe once; after that, anyone who can edit an article can publish it. Publishing uses no credits.
- 1
Copy a ReadMe API key
In your ReadMe project, open Configuration → API Keys and copy a key, or create one if the list is empty. - 2
Connect ReadMe in Clevera
Open the workspace menu, choose Integrations, find ReadMe and click Connect. Paste the key into API key and click Check key. - 3
Confirm the project
When you see “Key accepted.” and your project under Sites to publish to, click Connect. - 4
Publish an article
In the article editor, click Share, open Publish, click the ReadMe tile, choose a Guide category and click Publish to ReadMe. - 5
Open it in ReadMe
When you see “Published to ReadMe.”, click Open in ReadMe, and set the guide’s visibility if it shouldn’t be public yet.
ReadMe integration questions
It works with projects on ReadMe Refactored, because Clevera uses ReadMe’s current (v2) API. Projects still on ReadMe’s older platform can’t be connected.
No. Clevera publishes to the Guides section: the getting-started, how-to and dashboard pages around your reference. Your API reference pages stay as they are.
Your project’s main (stable) version of the Guides.
Yes, by default. Clevera doesn’t set a visibility, so ReadMe uses its default, which is public. Hide the guide in ReadMe right after publishing if you want to review it first; later updates keep that visibility.
Clevera looks for a guide with the same address anywhere in your Guides and shows “This article is already in ReadMe.” Update it to overwrite the guide at the same address, or create a new guide under a new title. Changes made in ReadMe since the last publish are overwritten by an update.
No. Publishing goes one way, from Clevera to ReadMe. A guide in ReadMe doesn’t change when you edit the article in Clevera until you publish again, so keep the article in Clevera as the source for any guide that shows your dashboard.
The workspace owner or an Administrator connects ReadMe once with the project’s key. After that, anyone who can edit an article can publish it to ReadMe, without ever seeing the key. Someone who can only view the article can’t publish it.
Yes, that’s a separate, free feature. See the ReadMe import and how Clevera compares with ReadMe. This integration is for teams who keep their developer hub on ReadMe.
Publishing to ReadMe is part of Clevera’s Pro and Custom plans and uses no credits; making the article uses credits as usual. See pricing.
Your next getting-started guide, already in ReadMe.
Record the flow once. Clevera writes the guide and publishes it to your hub, screenshots and all.