GitBook integration
Publish step-by-step guides to GitBook from a screen recording
Show a feature once on screen. Clevera writes the how-to page with screenshots and publishes it into the GitBook space you pick, with hints, steppers, tabs and expandable blocks built from GitBook’s own blocks.
Native GitBook blocks
Images uploaded to the space
Update the same page
Any GitBook plan
What you can do
Product docs that keep up with every release,
without a writer for every page.
Developer and product teams pick GitBook because it looks good and stays organised. What it can’t do is write the pages. Clevera fills your spaces with clear, illustrated how-to guides made from a recording of the product itself.
A how-to page per feature
Record the flow you just shipped. Clevera writes the page: an intro, numbered steps, a screenshot for each step and the tips a reader needs.
GitBook blocks, not pasted text
Steps become a GitBook stepper, callouts become hints, tabs stay tabs, and code keeps its language and title. The page looks like your team wrote it in GitBook.
Screenshots stored in GitBook
Every screenshot is uploaded into the space as a file, so the page keeps working even if the article is deleted in Clevera.
Re-record when the UI changes
Edit the article in Clevera and publish again. Clevera finds the page and updates it in place, keeping its address and your links.
One space per language
Translate the article in Clevera, switch the language in the editor and publish each version to the space that holds that language.
Spaces you choose
Clevera connects with a personal access key you create in GitBook, and you pick which docs sites it may publish to.
How it works
From recording to GitBook page
in four steps.
Paste a GitBook key once. After that, every article in the workspace can become a page in your docs.
- 1
Connect with a key
Create a personal access token in GitBook’s Developer settings, paste it into Clevera and pick your sites. - 2
Clevera writes the page
From your screen recording, Clevera writes the how-to: headings, steps, hints and screenshots. - 3
Pick the space and publish
In Share, open Publish, choose the GitBook space and click Publish to GitBook. - 4
It’s live in your docs
The page appears at the top level of the space, with its images, as soon as the publish finishes.
See it in Clevera
Publishing to GitBook,
from the article’s Share window.
No Markdown export, no image re-uploads, no rebuilding steps by hand in the GitBook editor. The Share window that gives you a link and an embed code also publishes to GitBook.
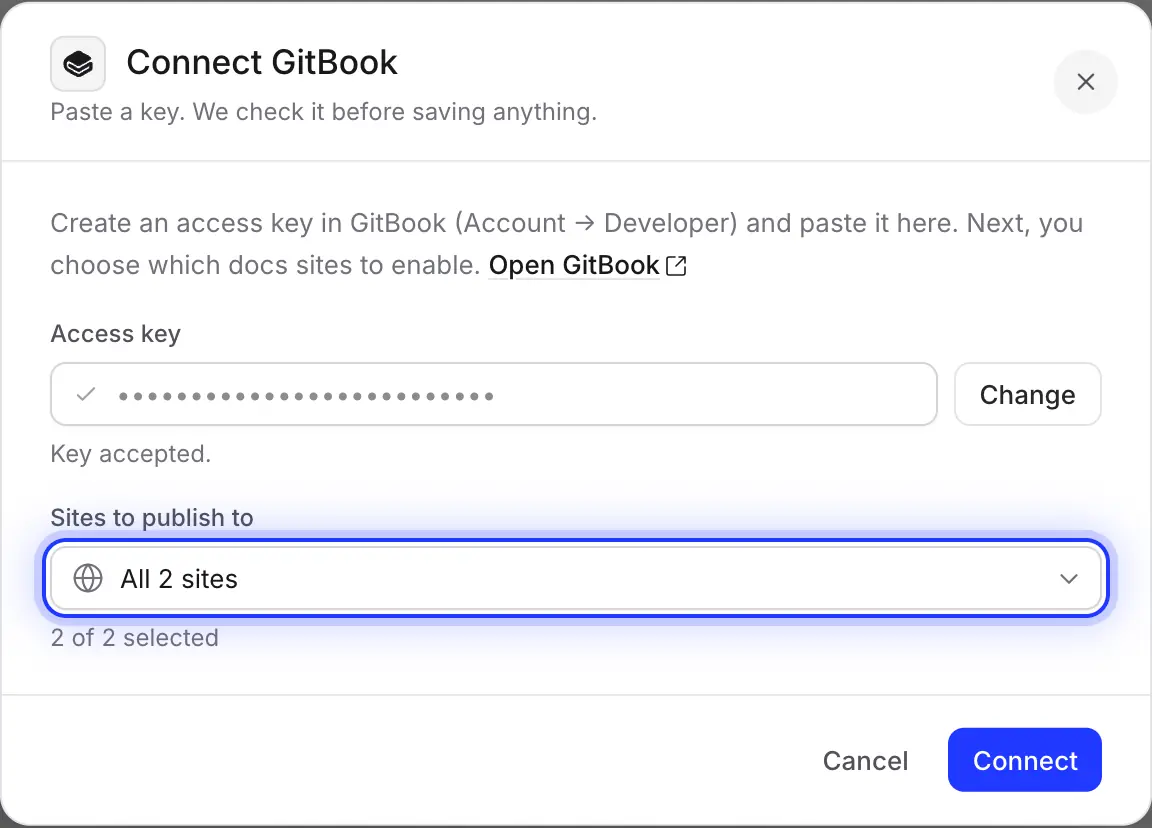
Connect with a key, checked before it’s saved
Paste a GitBook personal access token and click Check key. Clevera tests it with GitBook before saving anything, then lists your docs sites, all selected. Untick any you want to keep Clevera out of.
The key acts as the GitBook user who created it. A shared docs account keeps publishing working when people change teams.
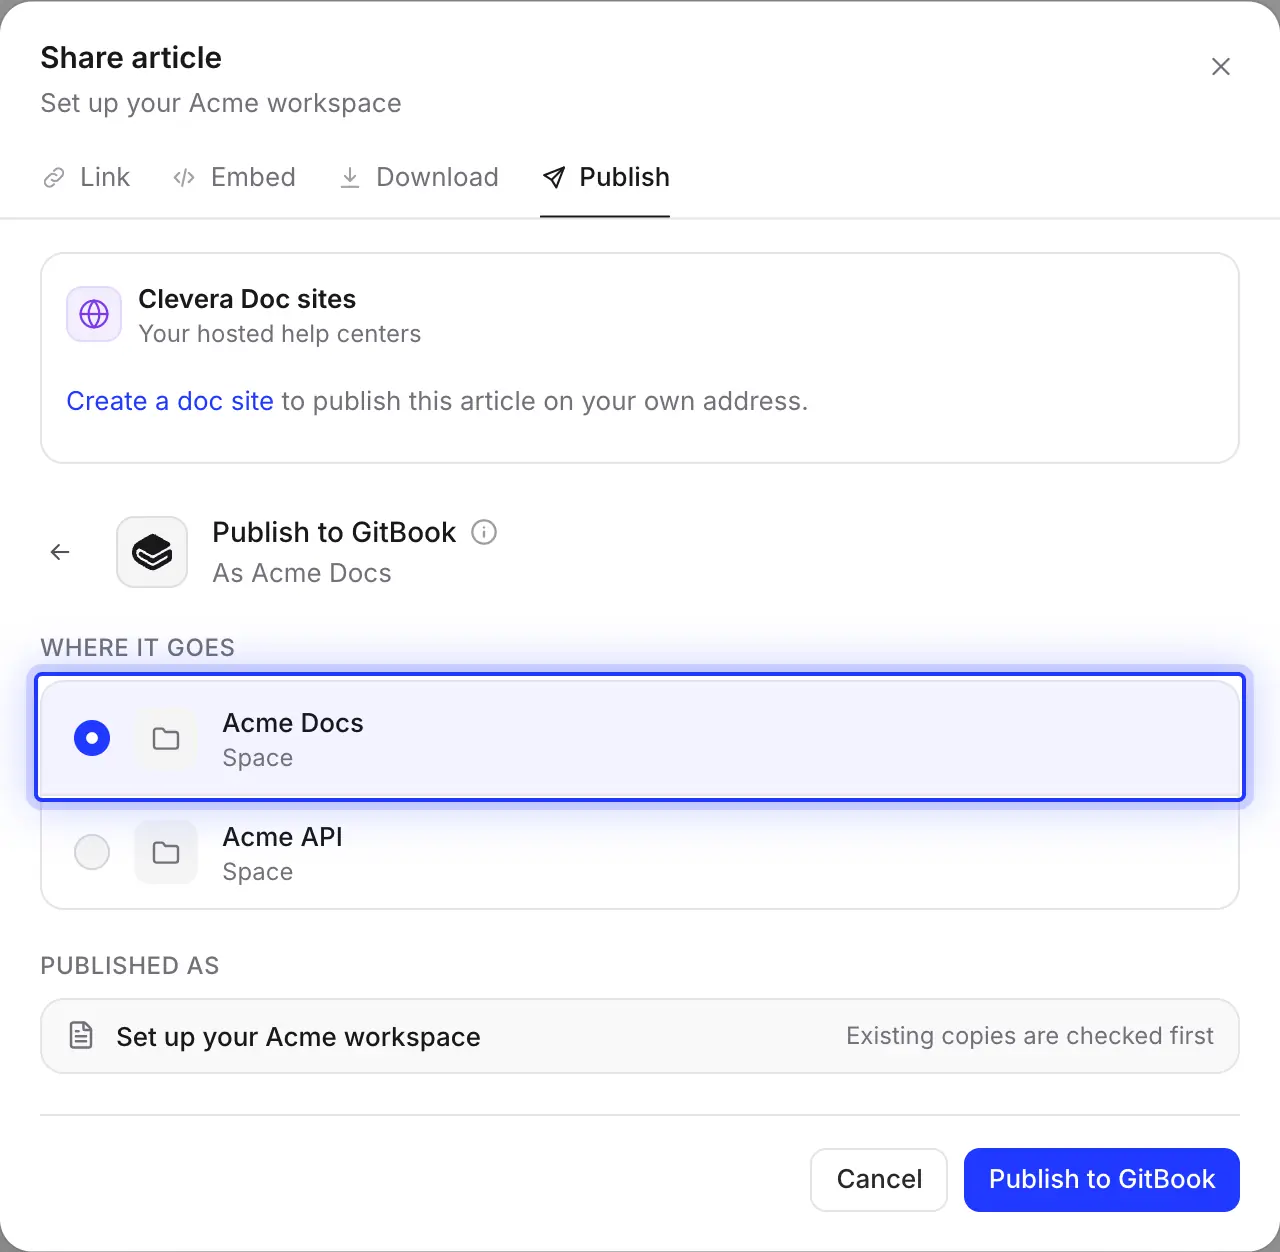
Choose the space the page goes into
The list shows the spaces behind the sites you chose, such as your product docs and your API docs. Pick one and publish. Clevera checks first whether the page is already there.
The page’s address comes from its title, so “Invite your team” becomes /invite-your-team. Move or rename it in GitBook whenever you like.
Filled in for you
How your article becomes a GitBook page
block by block.
Clevera builds the page from GitBook’s own document blocks, so it edits like any other page in your space. Here is what each publish contains.
- SpaceYou choose
- Any space behind the docs sites you selected when connecting. Change the sites at any time with Reconnect.
- Page title and addressSet for you
- The article’s title, and an address made from it, at the top level of the space. Titles with accents or in other scripts are spelled in Latin letters first.
- StepsConverted for you
- Numbered steps become a GitBook stepper, one GitBook step for each step of the article.
- CalloutsConverted for you
- Hint blocks: info and note become Info, tip and success become Success, warning becomes Warning and danger becomes Danger.
- Tabs, toggles and codeConverted for you
- Tabs stay GitBook tabs, collapsible sections become expandable blocks, code blocks keep their language and title, and equations use GitBook math.
- ScreenshotsSet for you
- Uploaded into the space as files, with their captions.
- VideosSet for you
- Videos and embeds placed in the article become GitBook embed blocks. A Clevera video is included when its share link is on. The video the article came from isn’t added.
- Change requestSet for you
- Clevera writes the page through a GitBook change request and merges it straight away, so the page is live when the publish finishes.
Setup
Set up the GitBook integration
in about two minutes.
You need a Clevera workspace on Pro or above and any GitBook plan. The workspace owner or an Administrator connects GitBook once; after that, anyone who can edit an article can publish it. Publishing uses no credits.
- 1
Create a GitBook access key
In GitBook, open your account settings, go to Developer, create a personal access token named “Clevera” and copy it. GitBook shows it only once. - 2
Connect GitBook in Clevera
Open the workspace menu, choose Integrations, find GitBook and click Connect. Paste the key into Access key and click Check key. - 3
Pick your sites
Under Sites to publish to, keep the docs sites Clevera may use and click Connect. No spaces yet? Clevera creates one named “Clevera” for you. - 4
Publish an article
In the article editor, click Share, open Publish, click the GitBook tile, choose a space and click Publish to GitBook. - 5
Open it in GitBook
When you see “Published to GitBook.”, click Open in GitBook to see the page.
GitBook integration questions
Clevera opens a change request and merges it right away, so the page is live as soon as the publish finishes. If every change in your docs is reviewed first, publish to a draft space and move the page from there once it’s approved.
At the top level of the space you pick. Move it into the right group or under a parent page in GitBook afterwards, and rename it if you like.
Clevera looks for a page with the same title or address and asks what to do. Update it to replace its title and content while keeping its address, or create a new page under a new title. Edits made in GitBook since are overwritten by an update, and GitBook’s history lets you get them back.
No. Publishing goes one way, from Clevera to GitBook. Keep the article in Clevera as the source and publish again after you change it.
Not on Clevera’s side. It belongs to the GitBook user who created it, so if they lose access to your organization, publishing stops. Delete the key on GitBook’s Developer page to revoke it.
No. This integration keeps your docs in GitBook and adds pages to it. If you’d rather host your help center with Clevera, see the free GitBook import and how Clevera compares with GitBook.
Publishing to GitBook is part of Clevera’s Pro and Custom plans and uses no credits; making the article uses credits as usual. Any GitBook plan works, as long as the key’s user can edit the space. See pricing.
Ship the feature. The GitBook page follows.
Record it once. Clevera writes the guide and publishes it to your space, screenshots and all.