Record a web app demo automatically with AI

You can now record a web app demo automatically by writing down what to show and handing it to an AI agent that clicks through your product in a cloud browser while it records. Whether the take is usable depends on what you set up before it starts: the account it signs into, the data on screen and the instruction you write. This guide covers each one, what to do when the agent gets stuck, and when a Playwright or Puppeteer script is the better tool.
How automatic website recording works
In Clevera, the AI recorder takes 2 inputs: a start page and a written instruction describing what to show. An AI agent opens the start page in a cloud browser, performs the steps and records the session. You watch it run, can take over the browser at any point, and hand control back when you're done.
By default the agent is read-only. It can navigate, open menus and read screens, but it won't create or edit anything unless you allow it. The finished recording lands in your library like any other recording, and you turn it into a narrated how-to video, a product demo or an article.
Step 1: Prepare a demo account and demo data
Everything the agent sees ends up in the video. Set up the account before you write a single instruction.
Use a dedicated demo account. Never point the agent at an admin account on production. A demo workspace with its own login keeps real customer data off screen and limits what any mistake can touch.
Seed realistic data. An empty dashboard makes a bad demo. Add 10 to 20 records with believable names, amounts and dates, so tables, charts and search results look like a team actually uses the product. Avoid "Test 1", "asdf" and real customer names.
Set the state the flow starts from. If the demo shows "create your first project", make sure no project exists yet. If it shows editing an invoice, make sure the invoice is there and has a clear name the instruction can point to.
Clear one-time interruptions. Dismiss onboarding tours, "what's new" modals and trial banners in that account first. Anything that pops up once per user will pop up in your recording.
Check the app is reachable from the internet. The agent runs in a cloud browser, so it can't open `localhost`, a staging server behind your VPN or anything IP-allowlisted to your office. Use a public demo or sandbox environment.
Step 2: Write an instruction the agent can follow
Most bad AI recordings come from vague instructions. The agent does what you wrote, in the order you wrote it, and fills gaps with guesses. Good instructions read like a short test script written for a person who has never seen your product.
Follow 4 rules:
1. Name the screens. Use the labels that appear in the UI: "Open Billing from the left sidebar", not "go to the money section". 2. Give the order. Number the steps. If the order matters to the story (set up, then use, then see the result), say so. 3. Point at exact elements. Name the button, tab, field or record: "Click the invoice INV-1042", "Open the Filters dropdown and choose Overdue". 4. Say where to stop. End on the outcome screen the viewer should remember, and tell the agent to stay there for a moment.
Here's the difference in practice.
Bad instruction:
> Show how our invoicing works.
The agent has to decide which screens matter, which record to open and when it's finished. You'll get a tour of whatever it finds first.
Better, but still loose:
> Show how to create an invoice and send it to a customer.
Clear goal, but no starting point, no customer, no line items. With a read-only agent, this also can't succeed, because creating an invoice is a write action.
Good instruction:
> Start on the Dashboard. 1) Click Invoices in the left sidebar. 2) Click the New invoice button at the top right. 3) In Customer, choose "Northwind Studio". 4) Add one line item: "Design retainer", quantity 1, price 2,400. 5) Click Save draft. 6) Open the draft and click Preview, then stop on the preview screen for 3 seconds. Do not click Send.
This names every screen and element, uses the exact customer from your seeded data, and draws a clear line at the one action you don't want taken. It also tells you, before you start, that this run needs create permission (see Step 4).
A few more habits help:
One flow per recording. "Create an invoice, then set up a recurring schedule, then export a report" is 3 videos. Shorter runs are easier to fix and easier to reuse.
Spell out values to type. If the agent has to invent text, it might invent something odd on camera.
Mention known quirks. "The Save button is disabled until the price field loses focus" saves the agent a few confused clicks.
Step 3: Pick a sign-in option
Most web app demos sit behind a login. You have 3 options:
Option | When to use it |
|---|---|
Skip sign-in | Public pages: marketing site, pricing, docs, a public sandbox |
Supply a login | A demo account with a password you're comfortable sharing with the tool |
Type it yourself | SSO, a password you don't want to hand over, or any login with a second factor |
The demo account from Step 1 pays off here. A demo-only password with access to demo-only data is the low-risk choice when you supply a login. If your company signs in through SSO with 2FA, typing it yourself is usually faster than trying to make the agent do it.
Step 4: Decide on read-only or create/edit
Read-only is the default, and it covers more demos than you'd expect (the risks of letting an agent write are in AI screen recording agent security): navigating, filtering, searching, opening records, switching tabs and showing reports.
Allow create or edit only when the flow genuinely needs it (creating a record, changing a setting, submitting a form) and only on a demo account. Then do 2 things:
Write the stopping point into the instruction, as in "Do not click Send" above. Actions that email people, charge cards or post to integrations should stay out of the run, or be disconnected in the demo workspace.
Reset the demo data afterwards, so the next run starts from the same state.
Step 5: Take over when the agent gets stuck
Some screens trip up any automated browser. Plan for them instead of rerunning the whole flow:
Cookie banners and consent pop-ups. Take over, accept or dismiss, hand back.
Custom date pickers and drag-and-drop. Unusual widgets are where agents waste the most time. Pick the date yourself and return control.
Captchas. These exist to stop automation. Solve it yourself.
2FA codes. Type the code from your phone, then hand back.
When you hand back, the agent picks up from the screen you leave it on. If the hand-over shows in the take, trim it in the editor.
Step 6: Keep runs short to keep credits down
The AI recorder uses credits based on how long the AI works, on every plan. That makes the instruction a cost lever. A precise instruction on a prepared account finishes fast. A vague one on an account full of pop-ups burns time on exploring, retrying and waiting. Plan credit amounts are on the pricing page.
What the recording becomes
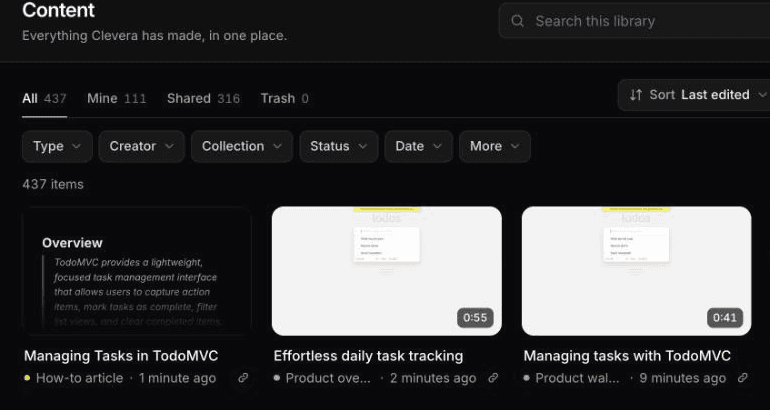
The raw take is the input, not the deliverable. From the same AI recording you can generate:
A how-to video. Clevera covers every required action in order, writes the script and adds an AI voiceover, so nobody narrates live. It's the format for help centres and onboarding. See how it works in the AI tutorial maker.
A product demo. The AI is selective here: it can skip low-value footage, reorder clips and narrate outcomes instead of every click. It's the format for sales and launch pages. Our product demo generator covers the demo formats.
An article. A written how-to with auto-selected, captioned screenshots, for docs and SEO.
Each is a separate content item, and videos and articles translate into 74 languages. When the UI changes, edits to narration and text update on hosted links and embeds, but the footage itself doesn't change. Rerun the same instruction to get fresh footage; how to update tutorial videos after a UI change covers when to re-record and when an edit is enough.
If you're unsure which format your audience needs, our comparison of interactive demos vs product videos and the guide on how to create a tutorial video cover the tradeoffs.
Our first run: 1 instruction, 78 seconds, 9 credits
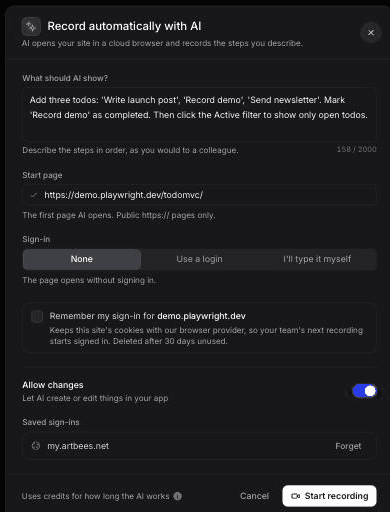
In October 2026 we ran the AI recorder on TodoMVC, a public demo app, with this instruction:
> Add three todos: 'Write launch post', 'Record demo', 'Send newsletter'. Mark 'Record demo' as completed. Then click the Active filter to show only open todos.
Sign-in was None. We switched Allow changes on, because adding and completing todos are writes, and we did that only because it's a public demo app with no real data behind it. On your own product, follow Step 4 instead.
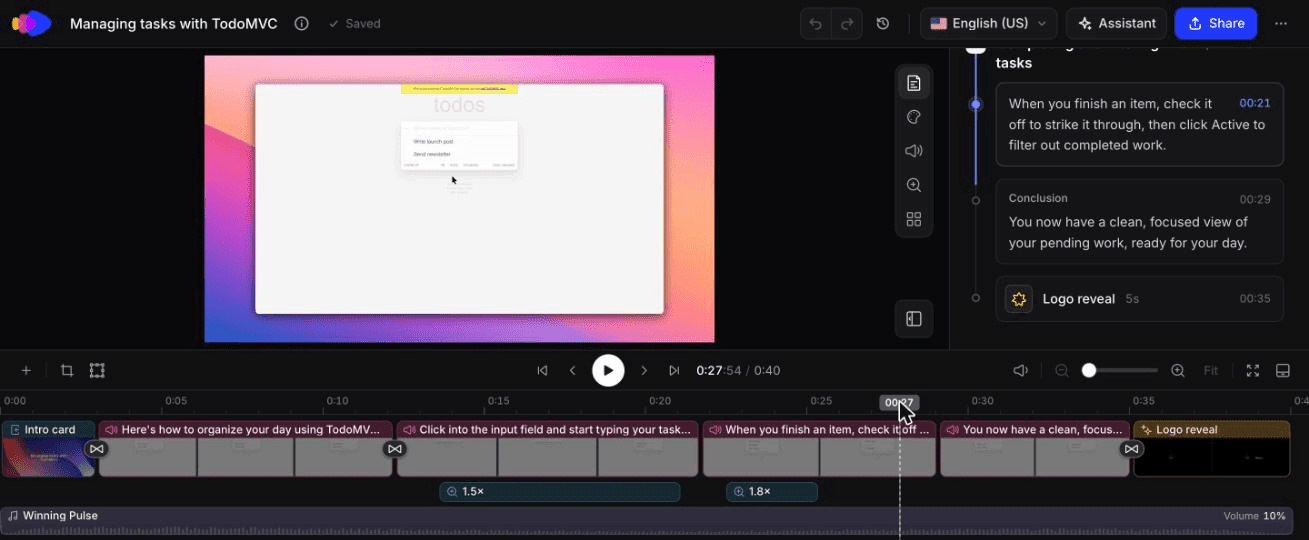
The agent did exactly what we wrote, in order, with no retries or wrong clicks that we saw, and we didn't need to take over. The run took about 78 seconds of wall-clock time and left 58 seconds of footage for a task a person does in about 20, because the agent pauses between steps. Clevera cut it to a 0:40 how-to video with 2 chapters, 6 steps and auto zooms at 1.5x and 1.8x, in about 50 seconds. Credits: 5 for the recording analysis and 4 for the how-to, 9 in all.
The 0:40 how-to video Clevera made from that AI recording, unedited.
What to watch: the footage came out faded and low-contrast, so check it before you publish. And our instruction wasn't numbered. It worked on a 3-step flow because it spelled out every value to type and the exact filter to click. For longer flows, number the steps.
The scripted alternative: Playwright and Puppeteer
Engineering teams have recorded browsers with automation scripts for years, and for some jobs a script is the better tool.
Playwright records video natively. In Playwright Test you set the `video` option to `'on'`, `'retain-on-failure'` or `'on-first-retry'`; with the library you pass `recordVideo` to `browser.newContext()` with a `dir` and an optional `size`. 2 details catch people out. Videos are saved only when the browser context closes, so you must `await context.close()`. And the video defaults to the viewport scaled down to fit 800x800, so set the viewport and `size` yourself if you want a sharp 1080p take. You don't have to write selectors by hand either: `npx playwright codegen` generates the script as you click through the app.
Puppeteer has `page.screencast()`, which records WebM at 30 FPS by default and requires ffmpeg on the machine. As of Puppeteer 25.13 the docs mark it obsolete in favour of `page.record()`, which outputs MP4.
A script is the better choice when:
You want the same flow recorded on every release, triggered from CI with no one watching.
The recording doubles as a test, and you care about failures as much as footage.
Your app lives somewhere a cloud browser can't reach, such as a private staging network your CI runner can see.
You have engineers who already maintain end-to-end tests and the selectors are stable.
The agent is the better choice when:
The person who needs the video is in product marketing, sales or support and doesn't write code.
The flow is one-off or changes often: a prospect-specific demo, a new feature, a help article.
You need a finished, narrated video, not raw footage. A script gives you a silent screen capture; narration, zooms and editing are still on you.
The 2 approaches combine well. Clevera accepts uploaded video, including silent recordings, so a team can record a flow with Playwright in CI and upload the file to generate the narrated how-to or demo.
Limits to know before you start
Web only. The AI recorder records websites and web apps in a cloud browser. It doesn't record desktop software or native mobile apps. For desktop flows, use the Clevera desktop app (macOS or Windows); for web flows you'd rather click yourself, the Chrome extension.
Reachable apps only. No `localhost`, VPN-only staging or IP-allowlisted tools.
Start with one flow your support team explains every week, on a demo account, with a numbered instruction that names every button. Watch the first run, note where you had to take over, and fold those notes into the instruction for the next one.